Mosaic Block

I love to create blocks in EQ 7 which utilize the AccuQuilt GO! dies. Blocks will be added to the Block category regularly to build a useful resource as a quick reference for your quilting. I try to use the GO! dies exclusively for their accuracy as well as to save my hands, back and shoulders. Whenever possible I'll include the dies for both an eight inch block and a 12 inch block. AccuQuilt GO! Dies and rotary cutting instructions are provided.
Fabric
Fabric A - Light Blue fabric
Fabric B - Dark Blue fabric
AccuQuilt GO! Dies
8" Block
Cut 16 Fabric A Triangles - Go! Half Square 2" Finished Triangles: Die 55063 or Value Die 55018
Cut 16 Fabric B Triangles - Go! Half Square 2" Finished Triangles: Die 55063 or Value Die 55018
12" Block
 Cut 16 Fabric A Triangles - Go! Half Square 3" Finished Triangles: Die 55009 or GO! Bountiful Baskets 55048
Cut 16 Fabric B Triangles - Go! Half Square 3" Finished Triangles: Die 55009 or GO! Bountiful Baskets 55048
Rotary Cutting
8" Block
Cut 8 - 2 7/8" squares for half square triangles from Fabric A
Cut 8 - 2 7/8" squares for half square triangles from Fabric B
 12" Block

Cut 8 - 3 7/8" squares for half square triangles from Fabric A
Cut 8 - 3 7/8" squares for half square triangles0 from Fabric B
Block Assembly Instructions
1. Assemble sixteen Fabric A and Fabric B half square triangles. Refer to the Half Square Triangles from Squares diagram if using rotary cut pieces or visit the Half Square Triangles Quilting Basic Section for more information.
2. Finger press the seam allowances toward the darker fabric. Double check measurements of the half squares. If doing the 8" block, your half squares should measure 2 1/2" unfinished. If doing the 12" block, your half squares should measure 3 1/2" unfinished. If the square ended up too small, check your seam allowance is a scant 1/4" or if it was too big, trim down.
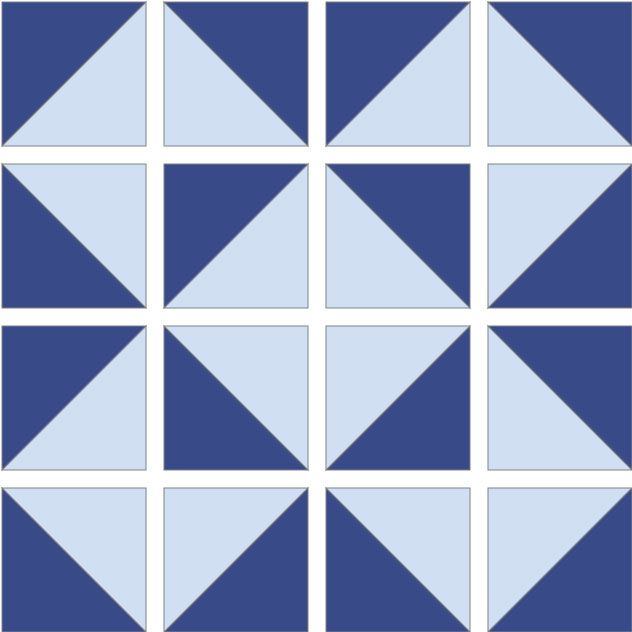
 3. Arrange the sixteen half square triangles as shown in the exploded view.
4. Starting with the first row, align, pin and sew the squares together to form the first row unit. Sew the remaining three rows in the same manner.
5. Press the seam allowances of each unit in opposite directions to make it easier to nest the seams.
6. Match the seam lines in the first and second row, nesting the seams then pin. Sew the first and second units together. Continue to add the third and fourth row units in this manner. Press the block on the back then the front.
Leave a Comment