Butterflies in the Sun

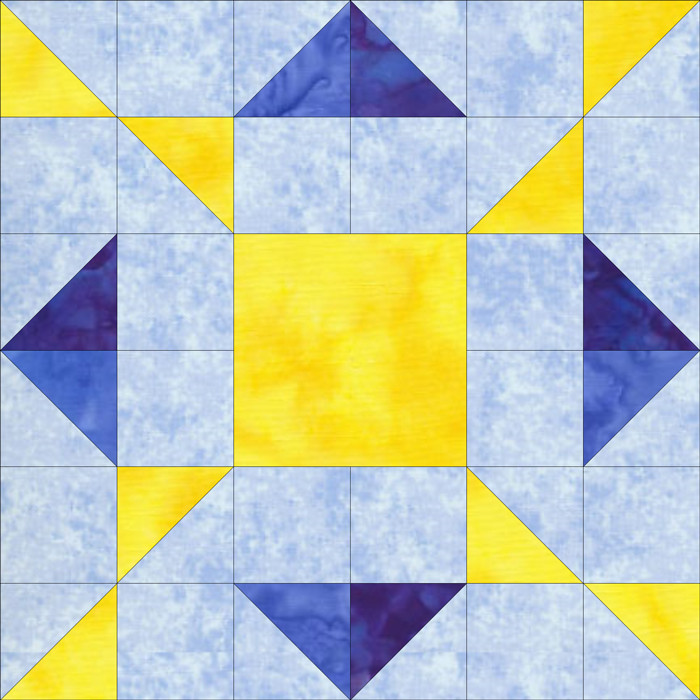
It's finally spring, but it's snowing here today. I thought a sunny
block would help keep me in the springtime mood. While designing this
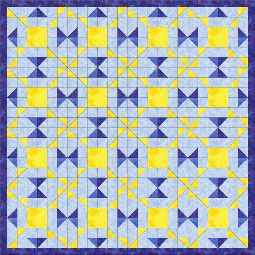
block the sun design revealed itself first, but then when I put the
block into the example quilt layout I notice there were also fun little
butterflies. Perfect for spring!
Fabric
Fabric A - Yellow
Fabric B - Dark Blue
Fabric C - Medium Blue
Fabric D - Light Blue
AccuQuilt GO! Dies
6" Block
Cut 8 - 1 1/2" half square triangles from Fabric A - Go! Half Square 1" Finished Triangles (55320)
Cut 4 - 1 1/2" half square triangles from Fabric B - Go! Half Square 1" Finished Triangles (55320)
Cut 4 - 1 1/2" half square triangles from Fabric C - Go! Half Square 1" Finished Triangles (55320)
Cut 16 - 1 1/2" half square triangles from Fabric D - Go! Half Square 1" Finished Triangles (55320)
Cut 1 - 2 1/2" squares from Fabric A - GO! 2 1/2" Square Multiples (55059), GO! Value Die (55018), or use the GO! 2 1/2" Strip Cutter (55014 or 55017) to cut strips and then rotate 90° and sub cut into 2 1/2" squares.
Cut 16 - 1 1/2" squares from Fabric D - Cut 1 1/2" strips with GO! Strip Cutter-1 1/2" (55024 or 55075), then rotate 90° and sub cut into 1 1/2" squares

12" Block
Cut 8 - 2 1/2" half square triangles from Fabric A - Go! Half Square 2" Finished Triangles (55063) or GO! Value Die (55018)
Cut 4 - 2 1/2" half square triangles from Fabric B - Go! Half Square 2" Finished Triangles (55063) or GO! Value Die (55018)
Cut 4 - 2 1/2" half square triangles from Fabric C - Go! Half Square 2" Finished Triangles (55063) or GO! Value Die (55018)
Cut 16 - 2 1/2" half square triangles from Fabric D - Go! Half Square 2" Finished Triangles (55063) or GO! Value Die (55018)
Cut 1 - 4 1/2" squares from Fabric A - GO! 4 1/2" Square Multiples (55060), GO! Value Die (55018), or cut 4 1/2" strips with the GO! 4 1/2" Strip Cutter (55054) and then rotate 90° and sub cut in to 4 1/2" squares.
Cut 16 - 2 1/2" squares from Fabric D - GO! 2 1/2" Square Multiples (55059), GO! Value Die (55018), or use the GO! 2 1/2" Strip Cutter (55014 or 55017) to cut strips and then rotate 90° and sub cut into 2 1/2" squares.
Rotary Cutting
6" Block
Cut 4 - 1 7/8" squares for half square triangles from Fabric A
Cut 2 - 1 7/8" squares for half square triangles from Fabric B
Cut 2 - 1 7/8" squares for half square triangles from Fabric C
Cut 8 - 1 7/8" squares for half square triangles from Fabric D
Cut 1 - 2 1/2" squares from Fabric A
Cut 16 - 1 1/2" squares from Fabric D
12" Block
Cut 4 - 2 7/8" squares for half square triangles from Fabric A
Cut 2 - 2 7/8" squares for half square triangles from Fabric B
Cut 2 - 2 7/8" squares for half square triangles from Fabric C
Cut 8 - 2 7/8" squares for half square triangles from Fabric D
Cut 1 - 4 1/2" squares from Fabric A
Cut 16 - 2 1/2" squares from Fabric D
Assembly Instructions
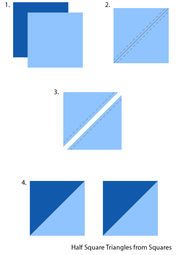
1. Assemble eight Fabric A and Fabric D half square triangles. Assemble four Fabric C and Fabric D half square triangles. Assemble four Fabric B and Fabric D half square triangles. Refer to the Half Square Triangles from Squares diagram if using rotary cut pieces or visit the Half Square Triangles Quilting Basic Section for more information.
2. Finger press the seam allowances toward the darker fabric. Double check measurements of the half squares. If doing the 6" block, your half squares should measure 1 1/2" unfinished. If doing the 12" block, your half squares should measure 2 1/2" unfinished. If the square ended up too small, check your seam allowance is a scant 1/4" or if it was too big, trim down.
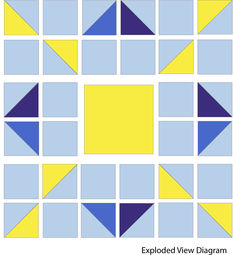
3. Arrange the squares and half square triangles as shown in the Exploded View Diagram.
4. Starting with the first row, align, pin and sew the squares and half square triangles together to form the first row unit. Sew the remaining rows in the same manner. The middle two rows will need to be assembled into squares and then sewn onto the center square.
5. Press the seam allowances of each unit in opposite directions to make it easier to nest the seams.
6. Match the seam lines in the first and second row, nesting the seams then pin. Sew the first and second rows together. Continue to add the remaining rows in this manner. Press the block on the back then the front.


